How To Use The Premium Discount Zones Indicator On TradingView In Forex Trading
Find Better Forex Trade Locations With Premium And Discount Zones
Successful forex trading is not just about knowing whether a currency pair is moving up or down. It is about understanding where price is trading, where a potential opportunity may develop, and whether the market offers a favorable risk-to-reward setup.
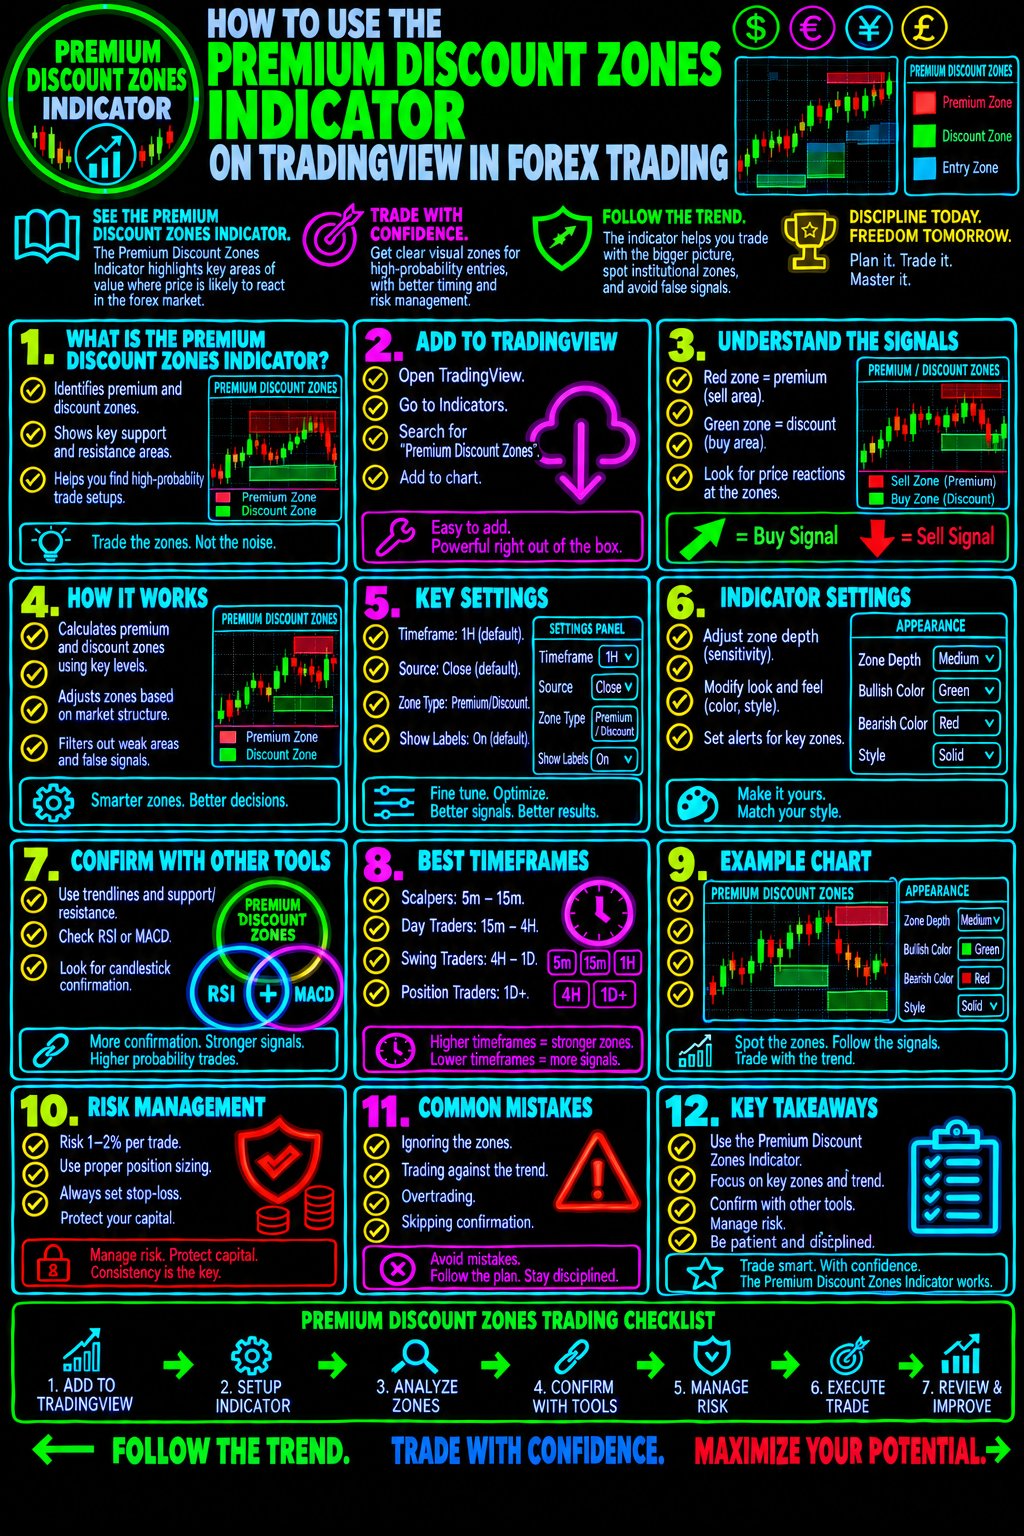
The Premium Discount Zones Indicator on TradingView helps forex traders visualize areas where price may be considered relatively expensive or inexpensive within a defined price range.
Instead of chasing a currency pair after a large move, you can use premium and discount zones to evaluate potential entry locations, identify areas of interest, and develop a more structured approach to trade planning.
On this page, you will learn how the Premium Discount Zones Indicator works, how to use it on TradingView, and how to incorporate it into a disciplined forex trading strategy.
Want to become a more confident and systematic forex trader? Forex Trading Unlocked provides the educational resources, technical analysis tools, and trading strategies to help you make more informed trading decisions.
Start here: Explore our Free Forex Trading Starter Kit and begin building a stronger trading foundation.
What Is The Premium Discount Zones Indicator?
The Premium Discount Zones Indicator is a technical analysis tool designed to divide a selected price range into different areas based on the relationship between price and that range.
In common market-structure analysis, the range between a significant swing low and swing high can be divided into three general areas:
- Premium Zone: The upper portion of the range, where price is relatively expensive compared with the range midpoint.
- Equilibrium Zone: The midpoint of the range, representing the 50% level.
- Discount Zone: The lower portion of the range, where price is relatively inexpensive compared with the range midpoint.
These concepts are frequently used in price-action and Smart Money Concepts trading methodologies.
The underlying principle is straightforward: rather than entering a trade anywhere on the chart, traders can evaluate whether price is approaching a location that fits their directional bias and trading plan.
However, premium does not automatically mean sell, and discount does not automatically mean buy. Market structure, momentum, liquidity, and confirmation remain important.
How Premium And Discount Zones Work In Forex Trading
Understanding the relationship between the zones and market direction is essential.
1. Premium Zone: Evaluate Potential Selling Opportunities
The premium zone occupies the upper portion of the selected trading range.
When the broader market structure is bearish, traders may watch this zone for potential selling opportunities. A pullback into premium can provide a location to look for bearish price action, resistance, or a failed attempt to continue higher.
Possible confirmation signals include:
- A bearish engulfing candlestick.
- A rejection candle near resistance.
- A break of short-term market structure to the downside.
- Bearish momentum divergence.
- A liquidity sweep followed by a bearish reversal.
The zone itself is not a sell signal. It identifies an area where a trader may begin looking for supporting evidence.
Learn more with our Japanese Candlestick Patterns Guide.
2. Equilibrium Zone: Understand The Range Midpoint
Equilibrium is generally represented by the 50% midpoint of the selected price range.
This level can help traders evaluate whether price is trading in the upper or lower half of the range.
Some traders prefer to wait for price to reach a premium or discount area before considering a position. Others use equilibrium as a reference point when evaluating retracements and potential continuation setups.
Equilibrium is not necessarily support or resistance. Its significance depends on the market context and how price behaves around the level.
3. Discount Zone: Evaluate Potential Buying Opportunities
The discount zone occupies the lower portion of the selected trading range.
When the broader market structure is bullish, traders may watch this zone for potential buying opportunities.
Instead of buying simply because price has fallen into discount, look for evidence that buyers are regaining control.
Potential confirmation signals include:
- A bullish engulfing candlestick.
- A rejection of lower prices.
- A bullish market structure shift.
- Positive momentum divergence.
- A liquidity sweep followed by a bullish recovery.
The objective is to combine location with confirmation rather than treating a zone as a guaranteed reversal point.
Explore our Forex Trading Strategies to learn how price action and technical analysis can work together.
How To Add The Premium Discount Zones Indicator To TradingView
Follow these steps to begin using the indicator on your forex charts.
Step 1: Open TradingView
Visit TradingView and open a chart.
Select a forex pair such as EURUSD, GBPUSD, USDJPY, or AUDUSD.
Choose a currency pair you understand and can monitor consistently.
Step 2: Locate The Indicator
Click the Indicators button at the top of the chart.
Search for Premium Discount Zones and review the available scripts.
Choose the specific indicator you intend to use. Multiple scripts may share similar names, and their calculations, settings, and features can differ.
If the indicator is private or invite-only, you may need access from its author.
Step 3: Add The Indicator To Your Chart
Select the appropriate script to add it to your chart.
Review the displayed zones, labels, and midpoint levels. Make sure you understand how the indicator identifies its trading range before using the zones to plan a trade.
Some indicators automatically identify swing highs and lows, while others require the trader to configure the range or adjust settings manually.
Step 4: Configure The Indicator Settings
Depending on the script, available settings may include:
- Swing length or lookback period.
- Range identification.
- Premium and discount boundaries.
- Equilibrium or midpoint display.
- Zone colors and labels.
- Multi-timeframe options.
Start with the default settings, then evaluate whether adjustments improve chart readability and fit your trading timeframe.
Avoid changing settings simply to make historical signals look better. Evaluate any changes on unseen price data and across different market conditions.
Step 5: Identify The Current Trading Range
Determine which swing high and swing low define the range being analyzed.
The usefulness of premium and discount zones depends heavily on the range selected. A zone calculated from an outdated or irrelevant swing may provide little value for a current trade.
Ask yourself:
- Is the range still relevant to current market structure?
- Has price established a meaningful new swing?
- Is the market trending or consolidating?
- Does the selected range match my trading timeframe?
These questions help prevent you from relying on zones without considering the broader chart.
How To Trade Premium And Discount Zones In Forex
The most effective way to use the indicator is to combine it with a repeatable trading process.
Strategy 1: Bullish Discount-Zone Setup
This approach looks for potential long entries in a bullish market.
Step 1: Establish bullish market structure.
Identify higher highs and higher lows or another clear indication that buyers remain in control.
Step 2: Identify the relevant trading range.
Use a meaningful swing low and swing high to determine the discount zone.
Step 3: Wait for a retracement.
Allow price to pull back into the discount zone instead of chasing the market after a strong upward move.
Step 4: Look for confirmation.
Look for bullish candlestick patterns, a market structure shift, or other evidence that selling pressure may be weakening.
Step 5: Plan the trade.
Determine your entry, stop-loss location, potential profit target, and position size before placing the trade.
Step 6: Evaluate the risk-to-reward ratio.
Consider whether the potential reward justifies the risk. If the setup is poorly positioned or the stop-loss is too wide, skip the trade.
A discount-zone entry is only a candidate opportunity. The market can continue falling through the zone.
Strategy 2: Bearish Premium-Zone Setup
This approach looks for potential short entries in a bearish market.
Step 1: Establish bearish market structure.
Look for lower highs, lower lows, or other evidence that sellers remain in control.
Step 2: Identify the relevant range.
Use a meaningful swing high and swing low to establish the premium zone.
Step 3: Wait for price to retrace upward.
Allow price to return to premium rather than selling impulsively after an extended decline.
Step 4: Look for bearish confirmation.
Evaluate bearish candlestick formations, resistance rejection, downside structure breaks, or a failed breakout.
Step 5: Define your risk.
Place the stop-loss at a technically meaningful invalidation level and calculate position size according to your risk limit.
Step 6: Establish a realistic target.
Potential targets may include prior swing lows, support areas, or other relevant price levels.
Do not assume price must fall merely because it has entered premium. Strong bullish markets can remain elevated or continue rising.
Combine Premium Discount Zones With Other Trading Indicators
The Premium Discount Zones Indicator becomes more useful when it is part of a complete trading framework.
The goal is not to add as many indicators as possible. The goal is to combine complementary information without creating conflicting signals.Premium Discount Zones + Market Structure
Market structure helps determine the direction in which you want to trade.
For example, a bullish market structure may encourage you to focus on potential buying opportunities in discount rather than selling simply because price has entered premium.
Explore our Market Structure Coach Indicator Guide to learn more about evaluating market structure.
Premium Discount Zones + Japanese Candlestick Patterns
Candlesticks can help you evaluate how price behaves after entering a zone.
A bullish engulfing pattern or strong rejection candle in discount may provide evidence supporting a potential long setup. A bearish engulfing pattern in premium may help identify a potential short setup.
Learn how to recognize these formations in our High-Probability Japanese Candlestick Patterns Guide.
Premium Discount Zones + Divergence
Momentum divergence can help identify situations in which price movement and an oscillator are moving in different directions.
For example, bullish divergence near a discount zone may suggest weakening downside momentum. Bearish divergence near premium may suggest weakening upside momentum.
Divergence is not a guaranteed reversal signal. It should be evaluated alongside price action and the broader market structure.
Explore our Divergence Scanner Indicator Guide for more information.
Premium Discount Zones + Multi-Timeframe Analysis
A higher timeframe can provide context for the range while a lower timeframe helps you evaluate potential entries.
For example, you might identify the broader trend on a four-hour chart, analyze premium and discount on that timeframe, and then look for confirmation on a 15-minute chart.
The exact combination depends on your trading style. Always verify that the selected ranges and signals make sense across the timeframes you use.
Learn more in our MTF Trend Dashboard Indicator Guide.
Common Premium Discount Zone Trading Mistakes
Even a well-designed indicator cannot replace sound trading decisions.
Avoid these common mistakes.
Mistake 1: Buying Every Discount-Zone Touch
Price can continue declining after entering discount. Wait for market context and confirmation rather than assuming that a lower price must produce a rally.
Mistake 2: Selling Every Premium-Zone Touch
Strong bullish markets can continue making new highs. Premium is a relative location within a range, not proof that price is overvalued or about to reverse.
Mistake 3: Ignoring Market Structure
A zone without directional context may produce conflicting opportunities. Evaluate the broader trend, swing structure, and nearby support or resistance.
Mistake 4: Using The Wrong Trading Range
If the selected range does not reflect current market conditions, the zones may be less useful. Reassess the range when meaningful new swing points develop.
Mistake 5: Ignoring Risk Management
A promising entry can still lose money. Determine your stop-loss, position size, and acceptable risk before entering.
Our Forex Risk Management Guide can help you develop a more disciplined approach to protecting trading capital.
Mistake 6: Overloading Your Chart
Using too many indicators can create confusion and encourage conflicting decisions. Start with a small set of complementary tools and establish clear rules for each.
Mistake 7: Trusting Historical Signals Without Testing
Some indicators may redraw zones or adjust swing points as new price data becomes available. Understand how your particular script behaves and test it under realistic conditions before relying on it with real money.
Build A Complete Forex Trading Plan Around Premium And Discount Zones
A trading indicator should support your plan, not become your entire plan.
Before entering a trade, answer these questions:
- What is the broader market direction?
- Which swing high and swing low define the current range?
- Is price in premium, equilibrium, or discount?
- Is the potential trade aligned with my directional bias?
- What price-action or momentum confirmation am I waiting for?
- Where will the trade idea be invalidated?
- How much capital am I risking?
- Where is my profit target?
- Does the potential reward justify the risk?
- Would I take this trade if the indicator were not on my chart?
If you cannot answer these questions clearly, wait for a better opportunity.
Your objective is not to trade every zone. It is to identify a small number of well-defined setups and execute them consistently.
For a stronger foundation, begin with our Free Forex Trading Starter Kit and explore our educational resources on technical analysis, trading psychology, and risk management.
Frequently Asked Questions About The Premium Discount Zones Indicator
What Does The Premium Discount Zones Indicator Do?
It helps traders visualize premium, equilibrium, and discount areas within a defined price range. These areas can be used to assess potential trade locations alongside market structure and confirmation signals.
Is The Discount Zone Always A Buy Signal?
No. Discount means price is in the lower portion of the selected range. Price may continue declining, particularly in a strong bearish market. Look for supporting evidence before considering a long position.
Is The Premium Zone Always A Sell Signal?
No. Premium identifies the upper portion of the range. In a strong bullish market, price may remain in premium or move higher. Market structure and confirmation are essential.
Can I Use Premium Discount Zones For Day Trading?
Yes. The concept can be applied to intraday forex trading, swing trading, and other approaches. The effectiveness depends on the selected timeframe, range definition, trading rules, and market conditions.
Which Timeframe Is Best For Premium Discount Zones?
There is no universally best timeframe. Higher timeframes can provide broader context, while lower timeframes can help refine entries. Choose timeframes that fit your trading plan and test them consistently.
Can I Combine Premium Discount Zones With Other Trading Indicators?
Yes. Traders often combine these zones with market structure, candlestick patterns, momentum analysis, and multi-timeframe confirmation. Favor complementary tools rather than adding indicators without a clear purpose.
Does The Indicator Guarantee Profitable Trades?
No. No indicator can guarantee profitable trades. Premium and discount zones are analytical references, and actual outcomes depend on market behavior, execution, risk management, and the quality of your trading process.
Take Your Forex Trading To The Next Level With Forex Trading Unlocked
Knowing where price is trading is only one part of becoming a better forex trader. You also need a repeatable strategy, disciplined risk management, and the ability to recognize when a setup is worth taking.
Forex Trading Unlocked brings together forex education, technical analysis, trading strategies, and practical resources designed to help you strengthen your decision-making process.
Start building your trading edge today:
- Get started for free: Download the Forex Trading Starter Kit.
- Improve your price-action skills: Study our Japanese Candlestick Patterns Guide.
- Develop a stronger strategy: Explore our Forex Trading Strategies.
- Protect your trading capital: Learn more through our Forex Risk Management Guide.
- Explore charting tools: Visit TradingView to analyze currency markets and investigate the indicators available for your trading approach.
Don't just chase price. Learn to evaluate location, wait for confirmation, and manage risk.
Join Forex Trading Unlocked and take the next step toward a more structured, disciplined approach to forex trading.
Risk Disclaimer: Forex trading involves substantial risk and may not be suitable for every investor. Technical indicators are analytical tools, not guarantees of future performance. Always test your strategy, use appropriate risk management, and never trade money you cannot afford to lose.
👉 “Get Instant Access (Check Your Email)”
💥 IMPORTANT: One Last Step Required
After you enter your email, check your inbox (or spam folder) for a confirmation email.
👉 Click the confirmation link so I can send you your free Forex training.
⚠️ If you don’t confirm, I can’t send you anything.
👉 “⚠️ Access expires if not confirmed within 24 hours minutes.”
👉 “Takes 10 seconds. Instant access after email confirmation.”